Crew & HR
This page is for administrators onboarding staff — assigning Blaqbook role groups and creating user records. Blaqbook role groups live under Extra Rights on the user form, which means you have to toggle Developer Mode to see them.
What this is / Why you'd use it
Onboarding a new staff member in Blaqbook takes two records that look almost identical but do different jobs. The Employee record is the HR-side identity — where pay info, emergency contacts, and job position live. The User record is the system-login identity — what they actually type a password into. The two share an email address; create the employee first, then the user, and Odoo connects them.
After the user record exists, you assign one of five mutually exclusive Blaqbook role groups: Executive, Event Manager, Finance, Trusted Staff, or Door / Crew. The group controls which menus and dashboards the person sees the next time they reload — there's no separate per-menu permission to flip.
Developer Mode is an Odoo toggle that unhides administrative settings. It doesn't enable anything dangerous on its own — it just exposes the menu we need for the Blaqbook role groups (they live under Extra Rights, which Developer Mode reveals). Turn it off after you're done; the user's role assignment stays in place either way.
You'd reach for this page when a new hire starts, when someone moves between roles (door crew getting promoted to trusted staff), or when you're deactivating a former staff member.
Assigning a User to a Blaqbook Role (admin only)
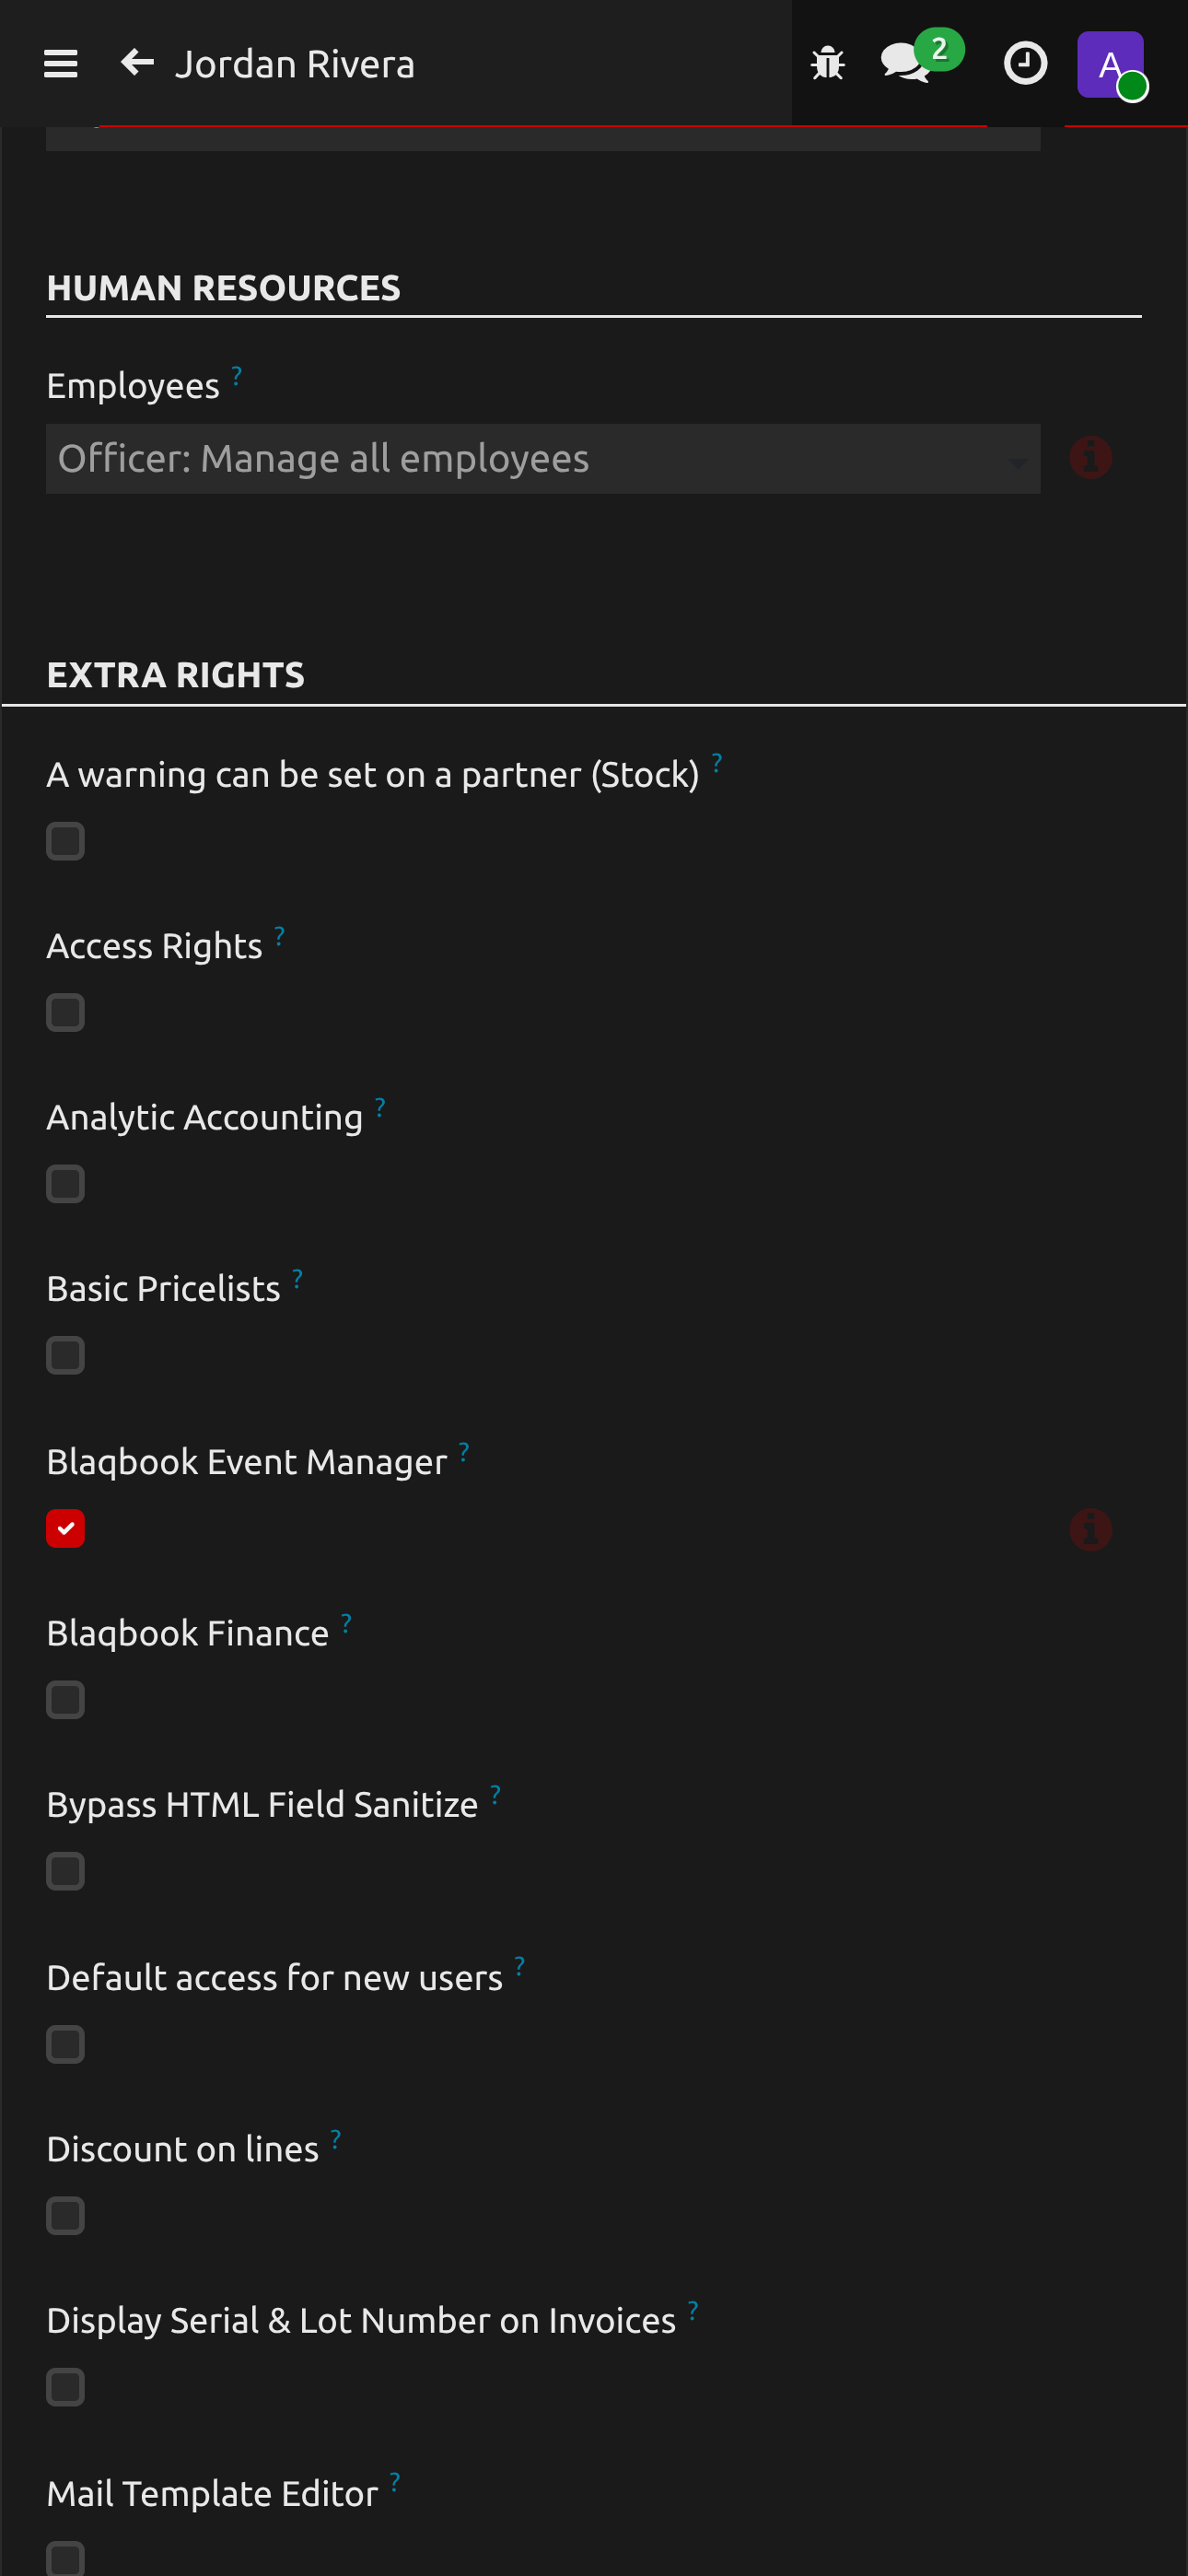
Blaqbook role groups intentionally live under Extra Rights on the user form, not in the regular access-rights checkbox column — you have to toggle Developer Mode to see them.
- Settings → Developer Tools → Activate Developer Mode. Without this, the Blaqbook groups don't show up on the user form.
- Settings → Users & Companies → Users, then open the target user.
- Click the Access Rights tab. Scroll to the Extra Rights section (only visible while dev mode is on).
- Tick exactly one of:
- Blaqbook Executive
- Blaqbook Event Manager
- Blaqbook Finance
- Blaqbook Trusted Staff
- Blaqbook Door / Crew
- Save. The user's menu visibility updates the next time they reload the page.
After you're done, you can turn Developer Mode back off (Settings → Developer Tools → Deactivate). The user's role assignment stays in place either way.
FAQ — Crew & HR
How do I add a new staff member to the system?
- Go to Employees (top menu)
- Click New → fill in their name, job position, and department
- To give them system access: go to Settings → Users → New User and assign the appropriate Blaqbook role group (see above)
For the full onboarding arc, see the walkthrough below.
Walkthrough: Adding a New Door / Crew Member
The Extra Rights section above is the click-by-click for the role-assignment step. This walkthrough wraps it in the full onboarding arc — employee record → user record → role group → first-login verification — so a new person can start scanning tickets on Friday night without ad-hoc back-and-forth.
The scenario: you've hired someone to work the door on Friday nights. They start this Friday. They need to scan tickets, see the Door Dashboard, and not see anything they shouldn't.
Step 1 — Create the employee record
The employee record is the HR-side identity. It's where you'd later attach pay info, an emergency contact, hours, etc. Even if you're not using Odoo for payroll, the record is the source-of-truth for "who works here."
- Employees (top menu) → New.
- Fill in:
- Name — full name as it should show on paperwork
- Job Position — e.g.,
Door / Crew(creates a job position record on first use) - Department — e.g.,
Operations - Work Email — their personal email (this is what they'll log in with)
- Work Phone — optional but useful for the on-call list
- Save.
If you're going to send them a welcome email or 1099 paperwork, fill in Address and Identification tabs while you're here. Otherwise skip.
Step 2 — Create the user record
The user record is the system-login identity. It's a separate record from the employee, but they share the same email.
- Settings → Users & Companies → Users → New User.
- Name → same as the employee (you'll thank yourself when audit logs need to match).
- Email Address → the same work email you used on the employee record.
- User Type → leave on Internal User (default). External and Portal users have restricted backend access and won't see the dashboards.
- Save. Odoo sends a password-setup email automatically — the new hire clicks it to set their own password.
Step 3 — Assign the Blaqbook role group
This is the same procedure as the Extra Rights section above, but here it is in onboarding context:
- Settings → Developer Tools → Activate Developer Mode. Without this, the Blaqbook groups don't appear on the user form.
- Open the user you just created → Access Rights tab → scroll to Extra Rights.
- Tick Blaqbook Door / Crew. Just that one. Don't also tick Executive or Manager — Blaqbook role groups are intended to be mutually exclusive at the operator level even though Odoo's UI lets you check more than one.
- Save.
- Toggle Developer Mode back off. The user's role assignment stays.
Step 4 — Verify on first login
Before Friday, have the new hire log in once and confirm they see what they should.
- They click the password-setup link from the welcome email and set a password.
- They log in at
https://[your-domain]/web(the backend) orhttps://[your-domain]/web/loginif you want them to bookmark a specific URL. - On first load, the top menu should show: Events, Calendar, Discuss, Apps (read-only). It should NOT show Settings, Invoicing, or Sales as full apps. If it does, the role group didn't take — recheck Step 3.
- Go to Events → Dashboards → Door Dashboard. The page should render with OPEN SCANNER at the top and the Active Events panel below. If they get an Access Error, the group isn't assigned correctly.
- Tap OPEN SCANNER — the camera permission prompt should fire. If the browser remembers a previous decline, walk them through enabling camera permission for your domain.
That's the full handoff. They're ready for Friday.
Common variations
- Existing employee, new role. Skip Step 1 (employee already exists). At Step 3, untick their current Blaqbook group before ticking the new one. (Most often: Door / Crew getting promoted to Trusted Staff.)
- Existing user, no employee record yet. Reverse the order — Step 2 already done, do Step 1, then Step 3. Common if someone started as a casual helper and is now formally on payroll.
- Deactivating a former staff member. Open the user → Action menu → Archive (don't delete; Odoo preserves audit history). Login is disabled but their past actions remain attributed.
Related
- Dashboards — each role group has a dedicated dashboard that lights up after the assignment
- Home — the role cards on the landing page summarize who sees what